

How to Use
Propiconazole 14.3%
For treating Oak Wilt, Dutch Elm Disease, Anthracnose, and Laurel Wilt
- Equipment:
- Chemjet syringe injectors
- Chisel (only needed for large bark furrows)
- Cordless drill with an 11/64″ or a 4.2 mm high-speed drill bit
- Propiconazole 14.3% MEC
- 2 ½ gallon bucket for loading & carrying syringes
- Eye protection and gloves
- Mixing container
- All-purpose disinfectant (always spray your drill bit from tree to tree along with any other tools)
Preparation
If using the preventative 10 mil dosage rate -Dilute 1 part with 1 part water and fill the syringe with 20 mil of the solution.
If used as therapeutic (the tree is showing signs of early infection) or if you are in a “high pressure” disease area then you will double the number of injectors to treat a tree. Do not use the same drill hole if you have to do two separate sets of injections as the wounds begin healing after 36 to 48 hours.
Safety
Propiconazole will sting eyes and cuts but causes no permanent damage if rinsed immediately. Follow the label directions. It may irritate sensitive skin, so wear elbow-length PVC gloves, safety glasses, and old clothes when injecting. Take care when using sharp equipment such as drills and chisels
Steps
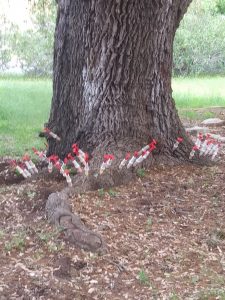
First, determine the number of injections you will need based on the tree’s diameter and what disease you are treating for. Treating for Oak wilt, for instance, will require one injection per diameter inch of the tree measured at breast height (4 1/2 feet) or below the first major branch if lower than breast height. Carefully load the Chemjet syringe from a bucket that contains the diluted solution. Immerse the tip o the syringe in the solution and pull the plunger back slowly to minimize any air bubbles forming in the syringe. Twist the plunger 1/4 turn to leave the syringe in the locked position. The syringes should not be preloaded and placed in the lock position for an extended period of time. The extended time period and spring force may damage the lock position slot. It is best to use the product-filled syringes in a minimum time following preloading. Place the loaded injectors handle down in your bucket otherwise, they will leak if the nozzle end is down.
When injecting, if the bark furrows are deep, remove only enough of the outer bark to get a good seal with the syringe. A chisel can be used, however, this is not broadly recommended as it can cause unsightly scars in the bark for a short time until they weather a while. If using a chisel be careful not to go deeper than the bark tissue.
Drilling into the tree needs to be deep enough to penetrate the xylem or sapwood. You can inject above the trunk flare about 4-6 “. If the bark is thick it is OK to move injections up a little farther. If you do have flare roots exposed, especially if treating for Oak wilt, then use those areas as well. Flare roots have thinner bark and more xylem tissue for better transportation of chemicals.

The syringe will penetrate the sapwood only about 1/2″ for a proper seal. The screw thread effect on the nozzle is for strength and does not need to be inserted into the tree. If weeping occurs, with the open palm of your hand, apply a gentle, but firm nudge to seat the syringe a little deeper into the sapwood.
As you insert the syringe nozzle into the drilled hole avoid any twisting to prevent damage to the syringe tip. You will not need to use the thread at the top of the syringe tip. (It is to provide strength to the nozzle). Gently push the syringe tip into the hole to get a good seal. The injector will seat within a 1/2″ into the sapwood. Release the plunger from the cocked position. As mentioned above, you may have to give the red plunger handle a gentle nudge with the open palm of your hand to help get a better seal.
Under ideal conditions, the syringes should be finished injecting in 3-5 hours. Trees can vary in the time taken to be injected depending on the tree’s health, time of day, and weather and soil conditions. You may have to leave the syringe overnight. If significant leakage occurs try injecting into another hole or delay injection to another day. Remove syringes once all the Propiconazole has been injected or after 36 hours.
Count the syringes before use to ensure that none are lost while injecting. After use clean the syringes in a hot water bath of at least 95 degrees. If you wish you can add a liquid disinfectant, such as Lysol or Monterey Consan 20(NO BLEACH!). Remove and drain in a bucket with holes by standing them on the handle. A regular application of WD-40 is sprayed into the back of the syringe body to ensure they will inject smoothly. Syringes should be disassembled at least once a season and cleaned thoroughly.
Wound Closure
There are very good research studies on wound closure. Small, Shallow holes should be enough to allow us to inject the needed amount of product into the tree and cause the least amount of damage. A tree in good general health condition, these very small shallow wounds (4.2mm or 11/64″drill portal) created in the drilling process close very readily and will heal within weeks. Oak trees generally have a higher rate of wound closure. I recommend using a mini grease gun and wax to fill the holes versus any kind of rubber plug or wooden dowel. The wax is waterproof and will seal the hole without any future damage potential(trees grow around the plugs and the long-term effects are not clear but I have seen tissue damage and stress cracks on some trees).
Remove the top and push the wax into the chamber, softening it as you insert. Works best in warm temps. In cold weather, you can just break off a piece and apply it directly to the hole. The toilet bowl donut and grease gun can be purchased at your local hardware store or plumbing store. It is non-allergenic to your trees.
The Don’ts and Some Tips
- The best time to inject is when the air temperature is above 50 degrees (trees will still be actively transporting water) and before the air temperature reaches 95 degrees (trees close stomata when the temperature rises to that degree). If you inject early and the heat rises to 95, don’t worry, once the temperature cools down the trees will begin to draw up water again.
- Do not inject when the trees are transitioning leaves as the chemical can burn the new growth. Most trees will have leaves harden off in early spring. Live oaks are usually by the beginning of May(I typically start in May and stop by March depending on the weather).
- Do not drill more than three drill holes at a time, a hot drill can burn the surrounding wood tissue and uptake will not happen. Also, you can better keep track of the holes as they are small and can be difficult to locate. So do only a few holes at a time to keep your drill cool.
Do not place the syringes too close together. This may cause phytotoxicity (leaves turning bronze). Maintain a minimum of 3 inches of spacing.
The uptake on the sunny side of the tree will be much faster than on the shaded side. A cool breeze will also promote a faster uptake and the same following a good rain. - The root flare is below the soil line and the trunk flare is above the soil line.
- Most importantly, do not inject a tree under drought conditions; if you must, make sure you water your trees thoroughly for a day or two before injection. Propiconazole under drought conditions can cause phytotoxicity in the leaves and could lead to eventual death.
- The Chemjet tree injectors deliver the same prescribed volume of the fungicide (Propiconazole 14.3% MEC) at the preventive rate of 10 mils per diameter inch in a 50% concentrated solution measured at 20 mils per injector. The Chemjet procedure with the higher concentration is much like a booster shot of an antibiotic only with far more effective results. The aim of tree injection is to use the tree’s natural transport system which uses the water within the tree for dilution to distribute pesticides, fungicides, and fertilizers throughout the entire tree to the areas where they are most effective.
- I do not recommend treating trees less than 5 inches in diameter as it is easy to drill past the xylem and into the heartwood.
CLEANING YOUR CHEMJETS:
There are 2 methods to cleaning the Chemjets depending on how many you have.
Method 1: Fill a bowl with hot water and draw up water into the Chemjet but don’t lock it. Instead off to the side release the handle and let the water shoot out. Repeat this step a couple of times and then pull back on the handle to dispel the remaining water until nothing comes out.
Method 2: Soak the Chemjets for about 10 minutes in a bucket of hot water and then stand them on the handle in a separate container with a drain hole and let them dry. I use this method mostly because I have a large quantity to clean at any one time. Once they are dry you can give the handle a few pulls to make sure no water is left in the tip before you load them again.
*You can add a small amount of liquid disinfectant to hot water if your Chemjets have any residue built up.
The gaskets need to be dry to maintain the suction. If they pop off when you are loading then you may have to open the Chemjet up and clean and dry the gasket and reassemble.
If the gaskets are not sliding up and down smoothly then a shot of WD-40 or spray silicone down the back of the body where the handle comes out and pulling up and down on the handle should free it up.
The Chemjet tree injectors are far less invasive and the wound closure, due to the small shallow holes will close within a few short weeks. The overall damage is reduced by more than 85% versus the Macro System.
Following the Macro injection, the dirt is replaced and fills the drill portals subjecting the tree to more peril. This delays wound closure and often causes canker or pathogenic infections in the root flare.
Excessive damage to the most critical transition area of the root flares limits the water and nutrient movement to and from the roots and can cause serious loss of vigor or eventual death.
